
Why the Wing Chun punch is different
Most people picture a punch as something that swings in from the side, powered by twisting the hips and shoulders. Boxing punches work that way, and they are effective. The Wing Chun punch is built differently. It travels in a straight line along the centerline with the fist held vertically, and its force comes from structural alignment and forward pressure rather than rotation.
The reason is range. Wing Chun is designed for close range, where there is very little room to wind up. A straight punch from the centerline is the shortest path to the target, it is hard to see coming, and it keeps your own centerline covered as it travels. If those ideas are new, start with centerline theory.
The mechanics of the straight punch
The fist
Close the hand firmly but without squeezing so hard that the forearm locks up. The fist is vertical, thumb on top. You strike with the bottom three knuckles.
The wrist
Keep the wrist straight so the knuckles, wrist and forearm form one line. A bent wrist leaks power and is the most common cause of sore wrists when students start hitting a bag.
The elbow
The elbow stays down and behind the fist and drives forward along the centerline. It does not swing out to the side. This is the immovable elbow principle in action, and it is where much of Wing Chun's short-range power comes from. If you watch only one thing in the mirror, watch the elbow.
The shoulder
Relaxed and dropped. A raised shoulder disconnects the punch from your body and slows it down.
The body
Upright and connected through the stance. Don't lean forward to reach. If the target is too far, step. The stance is where the punch gets its backing; my post on Wing Chun stances explains why.
Extension
In the air, extend the arm fully but don't snap the elbow into a hard lock. On a bag, stand at a distance where your arm reaches the target with a slight bend still in the elbow at impact.
Power from structure, not muscle
Wing Chun power comes from alignment. When your feet, knees, hips, spine, shoulder, elbow and fist are lined up, force can travel from the ground through your body into the target. Tension gets in the way of that. A tight shoulder, a clenched jaw or a locked arm all break the chain and make the punch slower and weaker.
That is why I teach relaxed punching first and contact later. Hitting hard before your structure is ready teaches tension instead of power. Push ups are a useful supporting exercise because they train a straight wrist, elbows close to the body and a braced core, but they don't replace technique practice. The principle behind all this is in the core principles of Wing Chun.
Chain punching (Lin Wan Kuen)
Chain punching is a continuous stream of straight punches along the centerline, each one following immediately after the last, hand over hand. Each punch is relatively light on its own; the effect comes from speed, volume and constant forward pressure. In application it is used to overwhelm a defence or to finish once an opening has been created. In training it builds speed, timing, coordination and structural consistency.
One hand is going out as the other is coming back, so at any moment one arm is striking and the other is guarding the centerline. That is simultaneous attack and defence built into the punch itself.
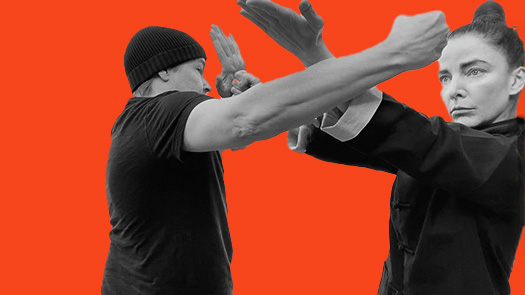
Chain punching drill: step by step
- Set your stance. Stand in your training stance, spine upright, shoulders relaxed. Bring both hands to the centerline, one in front of the other.
- One slow punch. Extend the lead hand along the centerline, vertical fist, elbow down and behind it. Check the wrist is straight.
- Swap slowly. As the first fist starts to come back, send the other hand out along the same line, passing close to the returning arm. The returning hand comes back to guard.
- Find a rhythm. Continue slowly for ten punches. The arms should cycle like a smooth wheel, never both out or both back at the same time.
- Add a little speed. Only once the shape stays correct, increase the pace slightly. Keep breathing; don't hold your breath.
- Check the line. Face a doorway edge or a strip of tape on a mirror and confirm both fists travel along the same line rather than drifting left and right.
- Finish relaxed. Slow down for the last few punches, return to guard, and let your shoulders drop.
In your first month, two to three minutes of slow, relaxed chain punching is plenty. Later, sets of 30 to 60 seconds work well, with rest between sets.
Common mistakes
- Elbows flaring out. The punch becomes a hook-like swing and the centerline opens. Keep the elbow behind the fist.
- Bent wrist. Line up the bottom three knuckles with the forearm.
- Raised shoulders. Check them every set and let them drop.
- Leaning forward. Stay upright. Step if you need to cover distance.
- Speed before structure. Fast, sloppy punches build bad habits. Slow down until the shape is right.
- Punches drifting off line. Use a doorway or mirror line to keep both fists on the centerline.
- Pulling back with tension. The returning hand should come back relaxed and ready to guard, not yanked back.
- Locking the elbow hard. Extend fully in the air without snapping the joint.
Safe progression on a wall bag
A wall bag is a flat striking pad mounted on a wall. It is one of the most useful and space-efficient Wing Chun tools, and it develops striking power, hand conditioning, alignment and forward pressure. It is not a day-one purchase. I usually suggest adding one once your punch is consistent in the air, often after the first few months. See rings and wall bags for what to look for.
Set it up properly
- Mount it at about chest to shoulder height so your punches land on your centerline.
- Fix it to a wall that can take repeated impact, and think about noise for neighbours.
- Stand at a distance where your arm reaches the bag with a slight bend still in the elbow at impact.
Build up gradually
- Weeks 1–2: light, relaxed punches for short rounds. Focus on alignment, not force.
- Weeks 3–4: if your wrists, knuckles and elbows feel fine the next day, lengthen the rounds slightly.
- After that: work toward sets of 30–60 seconds, still relaxed, adding a little more forward pressure only as long as the shape stays correct.
Let your hands, wrists and elbows adapt over weeks, not days. If something hurts the next day, go back a step. A folded towel or firm cushion taped securely to a sturdy wall can stand in for very light practice before you buy a bag. If you have arthritis, a previous hand or wrist injury, or another health condition, check with your doctor before starting any impact training. More on equipment in my post on Wing Chun training equipment.
Practice plan: 12-minute punching session
- Wrist circles, shoulder rolls and a short stance hold (3 min).
- Ten single slow punches per hand in front of a mirror, checking elbow and wrist (3 min).
- Chain punching in the air: three rounds of 30–60 seconds, slow and relaxed (4 min with rests).
- Optional: one or two light rounds on the wall bag if you are ready (2 min).
Add this after your Sil Lim Tao practice, three to five days a week.
Where the punch goes next
The punch rarely works alone. Pair it with Pak Sao and Lop Sao to clear the line, and with footwork from Chum Kiu so you can step and turn as you strike. A partner with focus mitts can feed a moving target; see partner drills. For how this fits into a full session, see the daily practice routine, and for an outside comparison, my post on Wing Chun vs boxing. If you want structured feedback on your punching, my online course reviews it by video at every level.
Frequently asked questions
Why is the Wing Chun punch vertical?
The vertical fist lets the elbow stay down and behind the fist, travelling straight along the centerline. That alignment lets force pass through a stable structure and keeps your own centerline covered while you strike.
Which knuckles should I hit with?
Punch with the bottom three knuckles and keep the wrist straight, so the force lines up through the forearm to the elbow. A bent wrist is the quickest way to sore wrists on a wall bag.
Where does the power come from if not hip rotation?
From structural alignment and forward pressure: a connected stance, an upright spine, relaxed shoulders and the elbow driving forward along the centerline. Wing Chun punches can be thrown rapidly at close range where there is no room to wind up.
How long should I chain punch for?
Beginners can start with two to three minutes of slow, relaxed punching in the air. Later, sets of 30 to 60 seconds work well, in the air or on a wall bag, focusing on structure and forward energy rather than speed.
When should I start hitting a wall bag?
Once your punch is consistent in the air, often after the first few months. Start with light, relaxed punches for short rounds on a padded bag and let your hands, wrists and elbows adapt over weeks, not days.
Next: Wing Chun kicks · wall bags · conditioning · all lessons